Making “Conway’s Fireworks”
To celebrate the upcoming 4th of July holiday I made a project called Conway’s Fireworks:
If the above embed isn’t working, you can also check it out here
In this post, I’d like to take you through some of my thinking when creating this project, and also some of the technical details of how it was coded. I’ll be talking about the following parts of the project:
Conceptualizing the Project
I wanted to make an animation to celebrate the 4th of July. Of course the first thing anyone thinks of when they think of the 4th of July is fireworks. There’s a large volume of great fireworks canvas animations out there already. I wanted to do something special to make mine stand out.
gospel gliders from Conway’s Game of Life
Now, If you’re not familiar with the famous automaton algorithm “Conway’s Game of Life”, (pictured above) definitely go check it out here: https://bitstorm.org/gameoflife/. The game of life is part of a class of algorithms called cellular automatons, and it has some pretty interesting behavior. The basic rules for the algorithm are fairly simple:
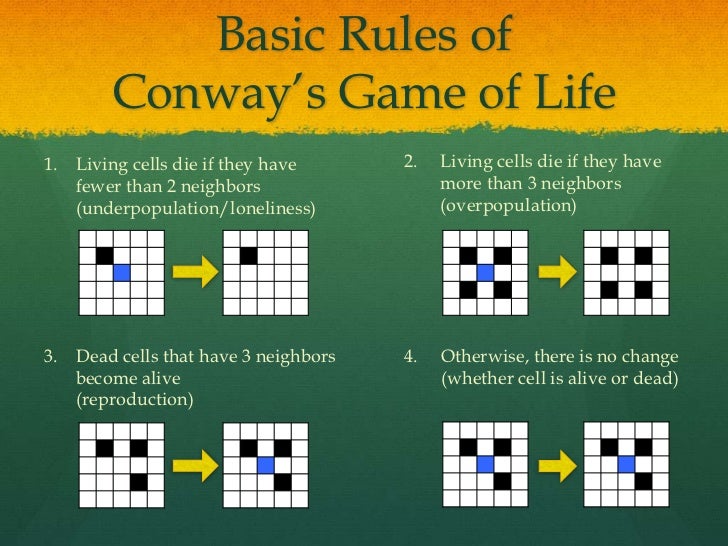
A great illustration of the rules of the Game of Life from Martin Pelikan
Although the simulation works off of just these 4 rules, lots of really interesting and complex behavior comes out of these simple rules. Conway’s game of life is a textbook example of emergence.
Even though John Conway himself is not too fond of the algorithm, It has always captured my imagination. So when I sat down to work on this project, the Game of Life was one of the first things that popped into my head as something different I could try out. The way the shapes tend to sort of explode outwards seemed like the perfect fit for how a firework behaves.
Ideas into Reality:
So I had my basic idea down. I would make each individual firework its own tiny Game of Life simulation. The trick now was to turn this idea into code. As with many of my projects, I used the P5 processing library and the html5 canvas. I like to work in this library because it speeds up development and makes drawing to the canvas easy. I like to work in JavaScript because then I can share my projects on the web.
The first step was to make on object prototype for my fireworks. I appropriately named this object “Conway” and filled it out with some basic fields to control the color, position, size, and so on. The grid variable simply contains a 2d array of values, true/false, for if a cell is on or off.
function Conway(){
  this.x = floor(random()*width);
  this.y = floor(random()*height*.7);
  this.type = floor(random()*3);
  this.size = random()*2;
  this.baseHue = random()*360;
  this.hueSwap = random()*30 + 60;
  this.gridSize = 61;
  if (this.gridSize%2 == 0) this.gridSize;
  this.center = floor(this.gridSize/2);
  this.numTicks = 0;
  this.finished = false;
  this.grid = [];
}
Here I’m hardcoding a lot of values, which is generally bad practice. I think in the future I will come back and make some global variables for things like the grid size or how much hue variance there should be.
Now that we have the skeleton of a Game of Life simulation we need to add two more components – a way to update it, and a way to display it to the screen. For me, I usually add these as functions in the object prototype in the form of a tick and render function. This is nice because it pushes the responsibility for updating and drawing the object to the object itself. When it comes time to run the project, all we have to do is call tick and render for each object currently in a list of drawables like so:
function draw(){
  for (var i = 0; i < drawables.length; i++){
    drawables[i].tick();
    drawables[i].render();
  }
}
The render function for our game is fairly simple to write. we simply draw a rectangle for each cell in our 2d array that has a value of true. The update function took a little bit more thought. To properly update the simulation, we need to apply the rules of the Game of life to each cell in the grid. One mistake I made early on was only having a single 2d array to store the values. In actuality we need 2 separate grids, because we can’t be overwriting the data from our first array with the new values until we have looked through the entire array. The final update function looked something like this:
this.tick = function(){
  var ind = (this.numTicks%2);
  for (var i = 0; i < this.gridSize; i++){
    for (var j = 0; j < this.gridSize; j++){
      var neighbors = 0;
      for (var k = 0; k < dirs.length; k++){
        var dx = i+dirs[k][0];
        var dy = j+dirs[k][1];
        if (dx >= 0 && dy >= 0 &&
          dx < this.gridSize-1 && dy < this.gridSize-1){
          if (this.grid[ind][dx][dy]) neighbors++;
        }
      }
      if ((this.grid[ind][i][j] &&
          (neighbors == 2 || neighbors == 3)) ||
          (!this.grid[ind][i][j] && neighbors == 3)){
        this.grid[(ind+1)%2][i][j] = true;
      } else {
        this.grid[(ind+1)%2][i][j] = false;
      }
    }
  }
  this.numTicks++;
}
This looks pretty complicated, but really all its doing is going through each cell in the grid and applying our 4 basic rules of the Game of Life simulation to them. the “ind” variable (short for “index”) simply lets me switch between which of my 2d arrays I’m looking at when I check which cells are alive or dead. The “numTicks” variable updates by one each time the tick function is called.
To make checking the 8 neighbors of each cell easier, I created a global array called “dirs” (short for “directions”) which contains the dx, dy values for each of the 8 neighboring cells.
The final hurdle was to get the “fireworks” to behave like an actual firework. This means that the fireworks have to be symmetrical about the center point. I had to think a little bit on how to do this. The trick is to separate the grid into quadrants, then randomly speckle alive cells into one of the quadrants (I picked the upper left quadrant). To make it look symmetrical, I then “flip” or “rotate” this quadrant onto the other 3 quadrants to make the “seed” for the shape. To do this, I simply added a bit of code that generates these quadrants when the object is created:
for (var i = 0; i < 10; i++){
  for (var j = 0; j < 10; j++){
    if (random() > .5){
      this.grid[0][this.center-i][this.center-j] = true;
      this.grid[0][this.center+i][this.center+j] = true;
      this.grid[0][this.center+i][this.center-j] = true;
      this.grid[0][this.center-i][this.center+j] = true;
    }
  }
}
The great thing about this is that because of the nature of the Game of Life, when you create a symmetrical seed, the rest of the game of life is naturally symmetrical about that center point!

Success!
That seemed to do the trick!
Touch-ups and Visuals:
Now that the core of the project is working, its time to start cleaning up the visuals. I find that this is always the most time consuming part of the project. I can spend hours making little tweaks to the look and feel of a canvas animation.
For starters, My fireworks felt really unrealistic. The Game of Life simulation naturally expands outwards, but it didn’t have that “pop and fade” feeling of a real firework.
To add that in, I added a couple of rules to my render function. I made the size and opacity values of the firework a function of how long it was on the screen for. A linear transition felt pretty unnatural, so I used the built in P5 pow function to create a quadratic curve for my size and opacity. By doing this, The fireworks expand outward really quickly in the beginning, and then have a slow fade out as their expansion slows down. Here’s what that looks like in code:
this.render = function(){
  this.numTicks++;
  var mod = pow(((48-this.numTicks)/40),2);
  this.size += mod*.5;
  var ind = this.numTicks%2;
  translate(this.x, this.y);
  scale(this.size);
  for (var i = 0; i < this.gridSize; i++){
    for (var j = 0; j < this.gridSize; j++){
      if (this.grid[ind][i][j]){
        fill(this.baseHue + random()*this.hueSwap,
             100, 100, mod*100);
        rect(i-this.center, j-this.center, 1, 1);
      }
    }
  }
}
In this case the “mod” variable is doing the heavy lifting of offsetting the size and opacity
Once I had that down the fireworks felt pretty natural, but I didn’t like that they were just sort of free floating in a black void.
To add some decoration to the scene, I added in some stars and hills to sort of round out the visuals and give it some aesthetics. The hills are simple sine curves with some offset by distance. For the stars, I decided to make them little squares and to make them “sparkle” a little by randomly changing the intensity and hue of the color by a little bit.
Conclusion:
I hope you all enjoyed reading this post! Let me know in the comments if you liked this and you would like to see more of these types of posts. Also let me know if you found my explanations useful or if there is anything I can do to improve my code or writing.
Whenever you are doing creative work, there will always be some things that you aren’t completely happy with. I think if I come back to this project I will clean up the code a little and change some of those hard-coded values into global variables. Also, I think I would spend a little bit of time tweaking the visuals for the fireworks, maybe changing how the curves work for the expansion and fade out animations.
All in all though, I’m pretty happy with this project. I think it was a neat idea, and I’m really pleased with how it turned out!
Thanks for reading!
— Ben
